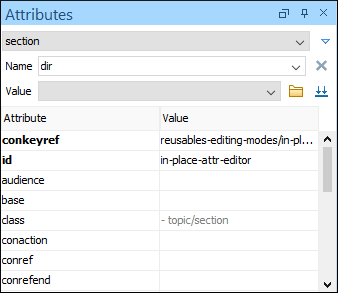
Attributes View in Text Mode
The Attributes view presents all the attributes of the current element determined by the schema of the document. By default, it is located on the right side of the editor. If the view is not displayed, it can be opened from the menu.
You can use the Attributes view to insert attributes, edit their values, or add values to existing attributes.
The attributes are rendered differently depending on their state:
- The names of the attributes are rendered with a bold font, and their values with a plain font.
- Default values are rendered with a plain font, painted gray.
- Empty values display the text "[empty]", painted gray.
- Invalid attributes and values are painted red.
list in the schema of the edited document, the
Value column acts as a combo box that allows you to either select the
value from a list or manually enter it. You can sort the attributes table by clicking the
Attribute column header. The table contents can be sorted as follows:
- By attribute name in ascending order.
- By attribute name in descending order.
- Custom order, where the used attributes are displayed at the beginning of the table sorted in ascending order, followed by the rest of the allowed elements sorted in ascending order.

Expand/Collapse Button
There is an Expand/Collapse ( /
/ ) button at the top-right of the view. When
expanded, this presents the following additional combo boxes:
- Name Combo Box
- Use this combo box to select an attribute. The drop-down list displays the list of
possible attributes allowed by the schema of the document, as in the
Attributes view. You can use the
 Remove button to delete an attribute
and its value from the selected element.
 - Value Combo Box
- Use this combo box to add, edit, or select the value of an attribute. If the
selected attribute has predefined values in the schema, the drop-down list displays
those possible values. You can use the
 Browse button to select a URL for the value of an attribute. You can
also press Ctrl + Space to open a content
completion window that offers a list of possible choices and allows you to select
multiple values. After you have entered or selected a value, use the
  Update button (or press
Enter) to add the value to the
attribute.Note:For built-in frameworks, if the selected attribute in the Name field is an
Update button (or press
Enter) to add the value to the
attribute.Note:For built-in frameworks, if the selected attribute in the Name field is an@idattribute, the Browse button is
replaced by a
  Generate Unique ID Value button. Clicking this button will
automatically generate a unique ID for the selected element.
