XSLT Stylesheet for Creating a Custom Operation
To demonstrate creating a custom operation, suppose that you have a task where you need to
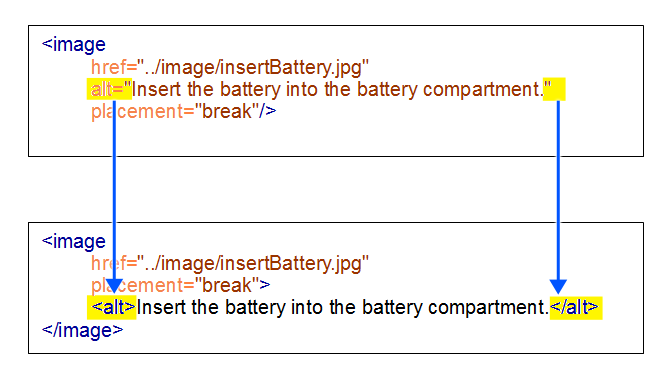
convert an attribute into an element and insert it inside another element. A specific example
would be if you have a project with a variety of <image> elements where a
deprecated @alt attribute was used for the description and you want to convert
all instances of that attribute into an element with the same name and insert it as the first
child of the <image> element.
Thus, the task is to convert this attribute into an element with the same name and insert it as the first child of the image element.

An XSLT stylesheet can be used to implement the new custom XML refactoring operation. The second requirement is an XML Refactoring operation descriptor file that contains the path to the XSLT stylesheet.
Example of an XSLT Script for Creating a Custom Operation to Convert an Attribute to an Element
- Iterates over all elements from the document that have the specified local name and namespace.
- Finds the attribute that will be converted to an element.
- Adds the new element as the first child of the parent
element.
<?xml version="1.0" encoding="UTF-8"?>
<xsl:stylesheet xmlns:xsl="http://www.w3.org/1999/XSL/Transform"
  xmlns:xs="http://www.w3.org/2001/XMLSchema"
  exclude-result-prefixes="xs"
  xmlns:xr="http://www.oxygenxml.com/ns/xmlRefactoring"
  version="2.0">

  <xsl:import
href="http://www.oxygenxml.com/ns/xmlRefactoring/resources/commons.xsl"/>

  <xsl:param name="element_localName" as="xs:string" required="yes"/>
  <xsl:param name="element_namespace" as="xs:string" required="yes"/>
  <xsl:param name="attribute_localName" as="xs:string" required="yes"/>
  <xsl:param name="attribute_namespace" as="xs:string" required="yes"/>
  <xsl:param name="new_element_localName" as="xs:string" required="yes"/>
  <xsl:param name="new_element_namespace" as="xs:string" required="yes"/>

  <xsl:template match="node() | @*">
      <xsl:copy>
          <xsl:apply-templates select="node() | @*"/>
      </xsl:copy>
  </xsl:template>
  <xsl:template match="//*[xr:check-local-name($element_localName, ., true())
     and
        xr:check-namespace-uri($element_namespace, .)]">

      <xsl:variable name="attributeToConvert"
         select="@*[xr:check-local-name($attribute_localName, ., true())
     and
        xr:check-namespace-uri($attribute_namespace, .)]"/>

      <xsl:choose>
          <xsl:when test="empty($attributeToConvert)">
              <xsl:copy>
                  <xsl:apply-templates select="node() | @*"/>
              </xsl:copy>
          </xsl:when>
      <xsl:otherwise>
          <xsl:copy>
              <xsl:for-each select="@*[empty(. intersect $attributeToConvert)]">
                   <xsl:copy-of select="."/>
              </xsl:for-each>
                <!-- The new element namespace -->
                <xsl:variable name="nsURI" as="xs:string">
                    <xsl:choose>
           <xsl:when test="$new_element_namespace eq $xr:NO-NAMESPACE">
                           <xsl:value-of select="''"/>
                        </xsl:when>
                        <xsl:otherwise>
                            <xsl:value-of select="$new_element_namespace"/>
                        </xsl:otherwise>
                    </xsl:choose>
                 </xsl:variable>
          <xsl:element name="{$new_element_localName}" namespace="{$nsURI}">
                    <xsl:value-of select="$attributeToConvert"/>
                 </xsl:element>
              <xsl:apply-templates select="node()"/>
         </xsl:copy>
       </xsl:otherwise>
     </xsl:choose>
  </xsl:template>
</xsl:stylesheet>
Example of an Operation Descriptor File That References the XSLT Stylesheet for Creating a Custom Operation to Convert an Attribute to an Element
After you have developed the XSLT stylesheet (for example, named convert-attribute-to-element.xsl), you have to create an XML Refactoring operation descriptor (for example, named convert-attribute-to-element.xml) that references the stylesheet and provides descriptions and possible values for its parameters. This descriptor is used by the application to load the operation details such as name, description, or parameters.
<?xml version="1.0" encoding="UTF-8"?>

<refactoringOperationDescriptor
 xmlns:xsi="http://www.w3.org/2001/XMLSchema-instance"
 xmlns="http://www.oxygenxml.com/ns/xmlRefactoring"
 id="convert-attribute-to-element"
 name="Convert attribute to element">
 <description>Converts the specified attribute to an element.
           The new element will be inserted as first child of the attribute's
           parent element.</description>
 <script type="XSLT" href="convert-attribute-to-element.xsl"/>
  <parameters>
   <description>Specify the attribute to be converted to element.</description>
    <section label="Parent element">
     <elementParameter id="elemID">
      <localName label="Name" name="element_localName" allowsAny="true">
       <description>Local name of the parent element.</description>
        </localName>
       <namespace label="Namespace" name="element_namespace" allowsAny="true">
         <description>Local name of the parent element</description>
       </namespace>
     </elementParameter>
    </section>
    <section label="Attribute">
     <attributeParameter dependsOn="elemID">
      <localName label="Name" name="attribute_localName">
       <description>Name of the attribute to be converted.</description>
      </localName>
     <namespace label="Namespace" name="attribute_namespace" allowsAny="true">
       <description>Namespace of the attribute to be converted.</description>
     </namespace>
     </attributeParameter>
    </section>
    <section label="New element">
        <elementParameter>
           <localName label="Name" name="new_element_localName">
               <description>The name of the new element.</description>
           </localName>
           <namespace label="Namespace" name="new_element_namespace">
               <description>The namespace of the new element.</description>
           </namespace>
        </elementParameter>
    </section>
  </parameters>
</refactoringOperationDescriptor><script> element
would look like
this: <script type="XSLT" href="convert-attribute-to-element.xsl"/>Results
After you have created these files, copy them into a folder scanned by Oxygen XML Editor when it loads the custom operation. When the XML Refactoring tool is started again, you will see the created operation.
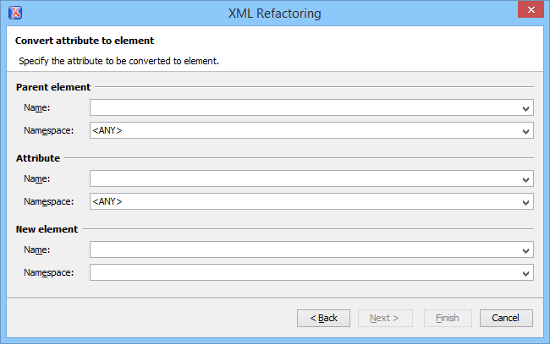
Since various parameters can be specified, this custom operation can also be used for other similar tasks. The following image shows the parameters that can be specified in the example of the custom operation to convert an attribute to an element:

Using Saxon Extension Functions to Allow Custom Refactoring Operations to Read and Modify Content Outside the Root Node
One advantage to using an XSLT stylesheet is that there is limitation when using an XQuery Update script in that refactoring operations can only be performed on comments or processing instructions that are inside the root element. Thus, using the XQuery method, comments or processing instructions that are in any node before or after the root element cannot be modified by an XML Refactoring operation.
The XSLT stylesheet method offers a work-around to this limitation through the use of some Saxon extension functions.
<?xml version="1.0" encoding="UTF-8"?>
<!-- comment before root -->
<?pi before root ?>
<root>
    <child></child>
</root>
<!-- comment after root -->
<?pi after root ?>http://www.oxygenxml.com/ns/xmlRefactoring/functions namespace.-
get-content-after-root() - Returns the content after root as
xs:string.For the XML above, the call of this function will return the following string value:<!-- comment after root --> <?pi after root ?> -
set-content-after-root(xs:string) - Updates the content that will be serialized in the refactored document after the root node.
The function callset-content-after-root('<!-- Inserted comment -->')will result in replacing the nodes after the root element with the comment passed as string argument. The XML document will be modified as follows:<?xml version="1.0" encoding="UTF-8"?> <!-- comment before root --> <?pi before root ?> <root> <child></child> </root><!-- Inserted comment --> -
get-content-before-root() - Returns the content before root as
xs:string.For the XML above, the call of this function will return the following string value:<?xml version="1.0" encoding="UTF-8"?> <!-- comment before root --> <?pi before root ?> -
set-content-before-root(xs:string) - Updates the content that will be serialized in the refactored document after the root node.
The function callset-content-before-root('<!-- Inserted comment -->')will result in replacing the nodes before the root element with the comment passed as string argument. The XML document will be modified as follows:<!-- Inserted comment --><root> <child></child> </root> <!-- comment after root --> <?pi after root ?>
XSLT Example:
<?xml version="1.0" encoding="UTF-8"?>
<xsl:stylesheet xmlns:xsl="http://www.w3.org/1999/XSL/Transform"
    xmlns:xs="http://www.w3.org/2001/XMLSchema" exclude-result-prefixes="xs"
    xmlns:xrf="http://www.oxygenxml.com/ns/xmlRefactoring/functions" version="3.0">
    <xsl:template match="/">
        <!-- The comment content that will be inserted after the root element -->
        <xsl:variable name="commentAsText"><!-- COMMENT ADDED FROM XR OPERATION-->
        </xsl:variable>
        <!-- Retrieve the content after the root element as is -->
        <xsl:variable name="after-root-content" as="xs:string"
                            select="xrf:get-content-after-root()"/>

        <xsl:variable name="processedContent"
                            select="concat($after-root-content, $commentAsText)"/>

        <!-- Update the content after the root element -->
        <xsl:value-of select="xrf:set-content-after-root($processedContent)"/>

        <xsl:apply-templates/>
    </xsl:template>

    <xsl:template match="node() | @*">
        <xsl:copy>
            <xsl:apply-templates select="node() | @*"/>
        </xsl:copy>
    </xsl:template>
</xsl:stylesheet>