Configuring Validation Scenarios for a Framework
You can distribute a framework with
a series of already configured validation scenarios. Also, this provides enhanced validation
support that allows you to use multiple grammars to check the document. For example, you can
use Schematron rules to impose guidelines that are otherwise impossible to enforce using
conventional validation.
Note:
If a main file is associated with the current file, the
validation scenarios defined in the main file, along with any Schematron schema
defined in the default scenarios for that particular framework, are used for the
validation. These take precedence over other types of validation units defined in the default
scenarios for the particular framework. For more
information on main files, see Contextual Project Operations Using 'Main Files' Support or Modular Contextual XML Editing Using 'Main Files' Support.
To associate a validation scenario with a specific framework, follow these steps:
- Open the Preferences dialog box and go to Document Type Association.
- Select the document type and click the Edit button to open the Document Type Configuration dialog box, then choose the Validation tab. This tab displays a list of document types. To set one or more of the validation scenarios listed in this tab to be used as the default validation scenario (when another one is not specified in the validation process) for a specific document type, check the Default box for that specific document type.
-
To edit an existing scenario, select the scenario and click the
 Edit button. To add a
new scenario, click the
  New button.
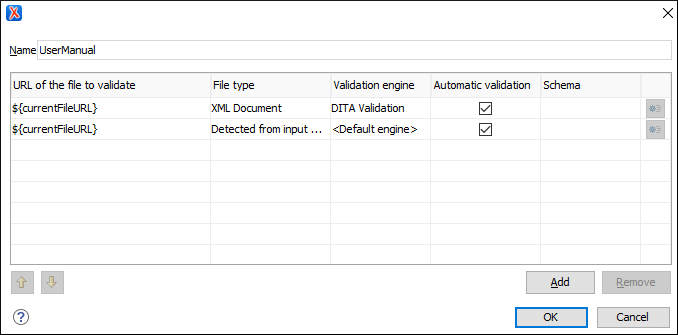
In either case, a scenario configuration dialog box is displayed. It lists all the validation units for the scenario.
New button.
In either case, a scenario configuration dialog box is displayed. It lists all the validation units for the scenario.Figure 1. Validation Scenario Configuration Dialog Box  This scenario configuration dialog box allows you to configure the following information and options:
- Name
- The name of the validation scenario.
- URL of the file to validate
- The URL of the main module that includes the current module. It is also the
entry module of the validation process when the current one is validated. To edit
the URL, double-click its cell and
specify the URL of the main module by doing one of the following:
- Enter the URL in the text field or select it from the drop-down list.
- Use the
 Browse drop-down button to
browse for a local, remote, or archived file.
 -
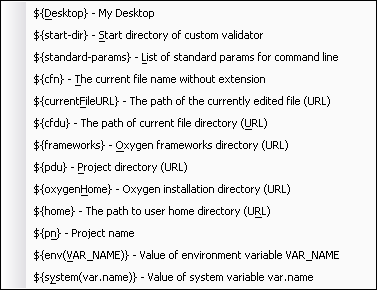
Use the
 Insert Editor Variable button to insert an editor variable or a
custom editor
variable.
Insert Editor Variable button to insert an editor variable or a
custom editor
variable.Figure 2. Insert an Editor Variable 
- File type
- The type of the document that is validated in the current validation unit. Oxygen XML Editor automatically selects the file type depending on the value of the URL of the file to validate field.
- Validation engine
-
You can select one of the engines available in Oxygen XML Editor for validation of the particular document type:
- Default engine - The default engine is used to run the validation for the current document type, as specified in the preferences page for that type of document (for example, XSLT preferences page, XQuery preferences page, XML Schema preferences page).
- DITA Validation engine -
Performs DITA-specific checks in the context of the specifications (it is similar to the
process when using the
 Validate and Check for
Completeness action in the DITA Maps
Manager, but for a local file rather than an entire DITA map).
 - DITA Map Validation and Completeness
Check engine - Performs a validation process that checks the
DITA map document and all referenced topics and maps (it is similar to the
process when using the
 Validate and Check for Completeness action in the
DITA Maps Manager).
 - DITA-OT Project Validation and Completeness
Check engine - Performs a validation process that checks each
context from the provided DITA-OT project file (it is similar to the
process when using the
 Validate and Check for
Completeness action in the DITA Maps
Manager).
 - Table Layout Validation engine - Looks for table layout problems (for more information, see the Report table layout problems option).
- Automatic validation
- If this option is selected, the validation operation defined by this row is also applied by the automatic validation feature. If the Automatic validation feature is disabled in the Document Checking preferences page, then this option is ignored, as the preference setting has a higher priority.
- Schema
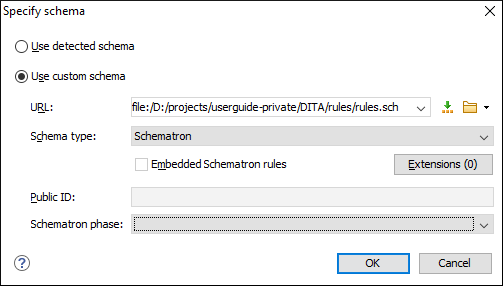
- This option becomes active when you set the File type to XML Document and allows you to specify the schema used for the validation unit.
 Settings
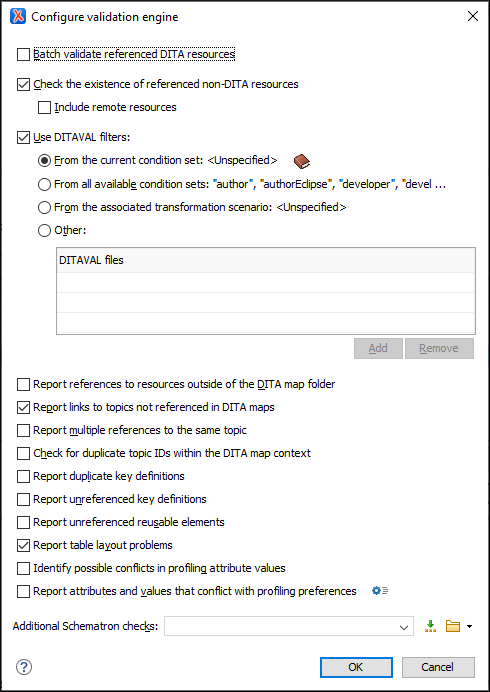
- Depending on the selected validation engine, clicking the
 Settings button either opens the
Specify Schema dialog box or the Configure
validation engine dialog box.
  Move
Up
Move
Up- Moves the selected validation unit up one spot in the list.
 Move Down
- Moves the selected validation unit down one spot in the list.
- Add
- Adds a new validation unit to the list.
- Remove
- Removes an existing validation unit from the list.
- Configure any of the existing validation units according to the information above, and you can use the buttons at the bottom of the table to add, remove, or move validation units. Note that if you add a Schematron validation unit, you can also select the validation phase.
-
Click Ok.
The newly created validation scenario is now included in the list of scenarios in the Validation tab. You can use the Default checkbox to specify that the new scenario be used as the default validation scenario when another specific scenario is not specified in the validation process.


 Details