Customizing Profiling Values with a Subject Scheme Map
Overview
A subject scheme map allows you to create and manage custom profiling values in DITA documents without having to write a DITA specialization. Ultimately, this allows you to filter and flag content in Author mode or in transformed output.
Subject scheme maps use key definitions to define a collection of profiling values. You can also use subject scheme maps to filter out (reject) the values for certain attributes so that you only see the attributes or values that you want to use in Author mode or the transformed output.
@type
attribute needs to be set to subjectScheme for the reference, as in the
following
example:<topicref href="test.ditamap" format="ditamap" type="subjectScheme"/>Advantages of Using a Subject Scheme Map
- You can create a hierarchy of profiling attribute values and use a DITAVAL file to filter or flag the tree of values.
- You can share the subject scheme files with others without having to share preferences or the entire project.
- The subject scheme offers validation support so you are notified if an undefined value is used.
Creating a Subject Scheme Map
- Use the New Document wizard to create a new Subject Scheme document ().
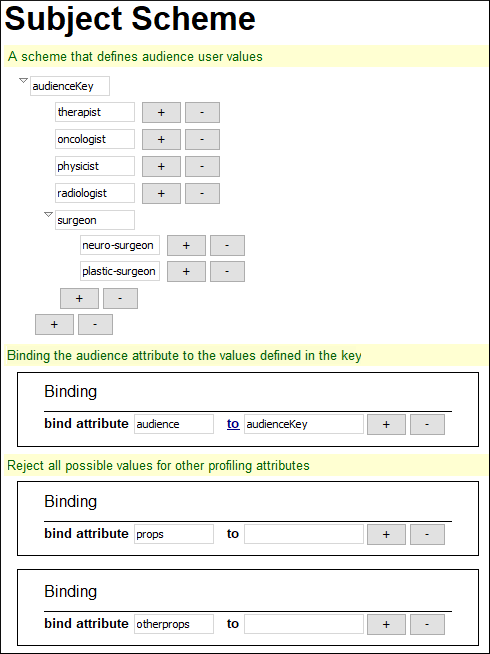
- Use the controls in Author mode to define the hierarchical tree
of values for your subject scheme (see the Author mode
example below) or switch to Text mode and define it
there if you prefer (see the Text mode example below).Note:The pre-defined subject scheme template includes Navigation Titles (
<navtitle>element). This element is not required, but if you use it, the text that you enter for the<navtitle>will be used (instead of the name of the value) in the various places where profiling attributes are presented in Oxygen XML Editor. An example of when this might be helpful is if you want to use abbreviations for the name of a value, but you want to see its full name in Oxygen XML Editor. - Bind the particular attribute to the key you define for the tree of values using the
<attributedef>and<subjectdef>elements inside the<enumerationdef>element. Notice that in the examples below, the audience attribute is bound to the audienceKey value.Tip:By default, attributes can accept multiple values, but you can useoutputclass="single_value"to specify that a certain attribute only accepts a single value at a time and the attribute will be presented in Oxygen XML Editor with radio buttons instead of checkboxes. For example:
You can also define a specific set of possible attribute values for a specific attribute name that is set on a specific element name. For example, you can define a specific set of<enumerationdef outputclass="single_value"> <attributedef name="audience"/> <subjectdef keyref="audienceKey"/> </enumerationdef>@outputclassattribute values only for the<image>element:<enumerationdef> <elementdef name="image"/> <attributedef name="outputclass"/> <subjectdef keyref="imgOutputClassValuesKey"/> </enumerationdef> - If you want to filter out (reject) values for certain attributes, bind the attributes
to a blank value (as you see for the
propsandotherpropsattributes in the examples below). This means that those attributes will not appear in the various places where profiling attributes are presented in Oxygen XML Editor. - Save your subject scheme file.
- Reference your subject scheme in the highest level of map (main DITA map) that will use the set
of profiling values and set its type to
subjectScheme. The easiest way to do this is:- With your subject scheme file opened in the editor, go to the DITA Maps Manager view, right-click the main DITA map, and select .
- In the Insert Topic Reference dialog box, go to the Attributes tab and in the Type field, enter or select subjectScheme.
- Click the Insert and Close button and save your main DITA map.
Using a Subject Scheme in Conjunction with a DITAVAL File
audience attribute in a hierarchical subject scheme
is surgeon and it has two subordinate values of
neuro-surgeon and plastic-surgeon (see the examples below). You could create a DITAVAL file with the following
content:<val>
<prop action="exclude" att="audience" val="surgeon"/>
</val>That DITAVAL file could then be used for a condition
set to filter content in Author mode or during the
transformation stage to filter
content in the output and the neuro-surgeon and
plastic-surgeon values would be excluded by the filter since the subject
scheme defines them as subordinate values of the surgeon value.
Example: Subject Scheme Map that Defines Custom Values for the Audience Attribute
This example uses typical audience values for medical personnel
(therapist, oncologist, physicist,
radiologist, surgeon, and so on). The
audience attribute is bound to the audienceKey value
(which defines the tree of values). You can also see that it filters out all possible values
for other attributes (props and otherprops) so that they
won't be available in the various places where profiling attributes are presented in Oxygen XML Editor.
Example using Author mode controls:

<subjectScheme>
  <!-- A scheme that defines audience user values -->
  <subjectdef keys="audienceKey">
    <subjectdef keys="therapist"/>
    <subjectdef keys="oncologist"/>
    <subjectdef keys="physicist"/>
    <subjectdef keys="radiologist"/>
    <subjectdef keys="surgeon">
      <subjectdef keys="neuro-surgeon"/>
      <subjectdef keys="plastic-surgeon"/>
    </subjectdef>
  </subjectdef>
  <!-- Binding the audience attribute to the values defined in the key -->
  <enumerationdef>
    <attributedef name="audience"/>
    <subjectdef keyref="audienceKey"/>
  </enumerationdef>

  <!--Reject all possible values for other profiling attributes-->
  <enumerationdef>
    <attributedef name="props"/>
    <subjectdef/>
  </enumerationdef>
  <enumerationdef>
    <attributedef name="otherprops"/>
    <subjectdef/>
  </enumerationdef>
</subjectScheme>
Where the Profiling Attributes are Available in Oxygen XML Editor
- The Profiling tab of the Edit Properties dialog box.
- The Edit Profiling Attribute dialog box.
- The inline profiling controls in Author mode.
- The proposals for the attribute values in the Content Completion Assistant.
Resources
For more information about using a DITA subject scheme map, watch our video demonstration:
