Step 5: Create a Custom CSS
If you read the Framework Customization Overview then you already have some basic knowledge about creating simple styles. The example document contains elements from various namespaces, so you need to use CSS Level 3 extensions (supported by the Author mode layout engine) to associate specific properties with that element.
Defining the General Layout
Now the basic layout of the rendered documents is created.
Elements that are stacked one on top of the other are: book,
article, section, title,
figure, table, image. These elements
are marked as having block style for display. Elements that are placed one
after the other in a flowing sequence are: b, i. These
will have inline display.
/* Vertical flow */
book,
section,
para,
title,
image,
ref {
    display:block;
}

/* Horizontal flow */
b,i {
    display:inline;
}block display children in an
inline display parent results in Oxygen XML Editor Eclipse plugin changing the
style of the parent to block display.Styling an Element
The title of any section must be bold and smaller than the title of the parent section. To
create this effect, a sequence of CSS rules must be created. The * operator
matches any element, it can be used to match titles having progressive depths in the
document.
title{
    font-size: 2.4em;
    font-weight:bold;
}
* * title{
    font-size: 2.0em;
}
* * * title{
    font-size: 1.6em;
}
* * * * title{
    font-size: 1.2em;
}
It is useful to have before the title a constant text, indicating that it refers to a
section. This text can include also the current section number. The :before
and :after pseudo-elements will be used, plus the CSS counters.
First declare a counter named sect for each book or
article. The counter is set to zero at the beginning of each such
element:
book,
article{
    counter-reset:sect;
}
The sect counter is incremented with each section, that
is a direct child of a book or an article element.
book > section,
article > section{
    counter-increment:sect;
}
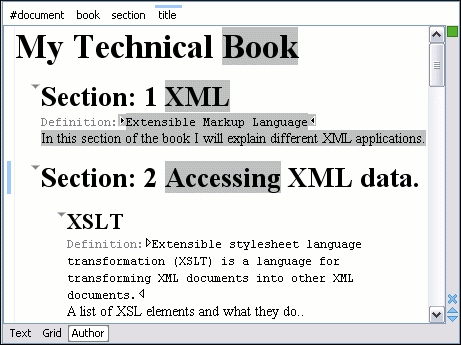
The "static" text that will prefix the section title is composed of the constant "Section
", followed by the decimal value of the sect counter and a dot.
book > section > title:before,
article > section > title:before{
    content: "Section " counter(sect) ". ";
}
To make the documents easy to read, you add a margin to the sections. In this way the higher nesting level, the larger the left side indent. The margin is expressed relatively to the parent bounds:
section{
    margin-left:1em;
    margin-top:1em;
}
In the above screenshot you can see a sample XML document rendered by the CSS stylesheet. The selection "avoids" the text that is generated by the CSS "content" property. This happens because the CSS generated text is not present in the XML document and is just a visual aid.
Styling Inline Elements
The "bold" style is obtained by using the font-weight CSS property with
the value bold, while the "italic" style is specified by the
font-style property:
b {
    font-weight:bold;
}

i {
    font-style:italic;
}
Styling Images
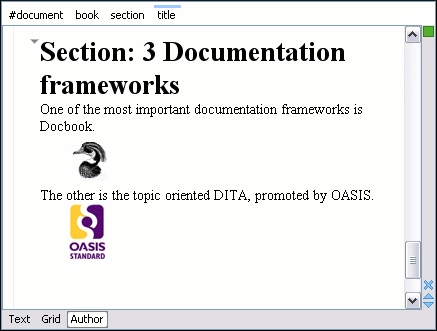
The CSS 2.1 does not specify how an element can be rendered as an image. To overpass this limitation, Oxygen XML Editor Eclipse plugin supports a CSS Level 3 extension allowing to load image data from a URL. The URL of the image must be specified by one of the element attributes and it is resolved through the catalogs specified in Oxygen XML Editor Eclipse plugin.
image{
    display:block;
    content: attr(href, url);
    margin-left:2em;
}image element has the required @href attribute of type
xs:anyURI. The @href attribute contains an image location
so the rendered content is obtained by using the
function:attr(href, url)attr function specifies the type of the content. If the type has the
url value, then Oxygen XML Editor Eclipse plugin identifies the content as being an
image. If the type is missing, then the content will be the text representing the attribute
value.Oxygen XML Editor Eclipse plugin handles both absolute and relative specified URLs. If the image has an absolute URL location (for example: "http://www.oasis-open.org/images/standards/oasis_standard.jpg") then it is loaded directly from this location. If the image URL is relative specified to the XML document (for example: "images/my_screenshot.jpg") then the location is obtained by adding this value to the location of the edited XML document.
An image can also be referenced by the name of a DTD entity that specifies the location of the image file. For example, if the document declares an entity graphic that points to a JPEG image file:
<!ENTITY graphic SYSTEM "depo/keyboard_shortcut.jpg" NDATA JPEG>and the image is referenced in the XML document by specifying the name of the entity as the value of an attribute:
<mediaobject>
    <imageobject>
        <imagedata entityref="graphic" scale="50"/>
    </imageobject>
</mediaobject>
The CSS should use the functions url, attr and
unparsed-entity-uri for displaying the image in the
Author mode:
imagedata[entityref]{
    content: url(unparsed-entity-uri(attr(entityref)));
}
To take into account the value of the @width attribute of the
imagedata and use it for resizing the image, the CSS can define the
following rule:
imagedata[width]{
  width:attr(width, length);
}
