OpenAPI Tester
Oxygen XML includes a testing tool for OpenAPI files. The tool provides the ability to inspect OpenAPI request responses and to ensure that they work as expected. It can be used for OpenAPI 3.x in JSON or YAML format.
To use the tool, select OpenAPI Tester from the menu. This opens a dialog box where you can specify the location of the OpenAPI file that you want to test.
This tool requires an additional add-on to be installed, so the first time you invoke the action, Oxygen XML presents a dialog box asking if you want to install it. Once installed, you need to restart Oxygen XML and the OpenAPI Tester action will invoke the tool.
Quick Installation
You can drag the following Install button and drop it into the main editor in Oxygen to quickly initiate the installation process:
Manual Installation
- Go to to open an add-on selection dialog box.
- Enter or paste
https://www.oxygenxml.com/InstData/Addons/default/updateSite.xml in the
Show add-ons from field or select it from the drop-down
menu.Note:If you have issues connecting to the default update site, you can download the add-on package, unzip it, then use the Browse for local files action in the Install new add-ons dialog box to locate the downloaded addon.xml file.
- Select the OpenAPI Tester add-on and click Next.
- Read the end-user license agreement. Then select the I accept all terms of the end-user license agreement option and click Finish.
- Restart the application.
Result: The OpenAPI Tester dialog box is now available and can be selected from the menu.
OpenAPI Tester Dialog Box

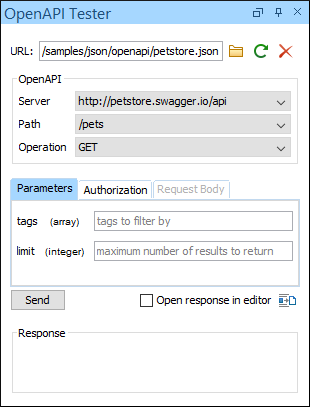
After selecting OpenAPI Tester from the menu, the OpenAPI Tester dialog box is displayed where you can select the URL for the OpenAPI document (either local or remote). After clicking OK, the OpenAPI Tester view becomes visible on the right side of the editor. The view can also be opened by selecting OpenAPI Tester from the menu.

- URL
- The URL of the OpenAPI file. You can specify the path by using the text field or the
 Browse button. If you specify the path directly in the text field, you need to
click the
  Reload button.
You can use the
  Clear
button if you want to remove all the content from the view.
 - Server
- The list of servers defined by the OpenAPI document. The global "servers" array can be overridden on the path level or operation level. If it is not provided or is empty, the server URL defaults to "/".
- Path
- The list of individual endpoints (paths) in the API. The full request URL is
constructed as
<server-url>/path. - Operation
- The list of HTTP operations supported by the selected path. OpenAPI 3.0 supports get, post, put, patch, delete, head, options, and trace.
- Parameters tab
- The definition of the parameters for the selected operation. OpenAPI 3.0 supports parameters passed via path, query string, headers, and cookies. The required parameters will be marked with a red asterisk. For array parameters, items must be separated by a comma.
- Authorization tab
- The list of available authentication types. The authentication data is persistent and can be removed from the contextual menu.
- Request Body tab
- The media type and the body of the request (if the selected operation allows it). For example, GET will not allow specifying a body since that HTTP method disallows it. Oxygen XML will create a sample request body based on the JSON Schemas defined in the OpenAPI document. Usually, you just need to change a few values for the request to be valid.
- Variables tab
- The list of variables used for server templating (if applicable). Variables are indicated by {curly brackets} in the server URL.
- Send button
- Executes the request by creating a HTTP client with all the information extracted from the view.
- Open response in editor
- If selected, the response will be opened in the main editing pane.
 Generate scenario
test
Generate scenario
test- Creates a test scenario file in JSON format, based on the information extracted from the view. The file is then opened in the main editing pane, and can be used to Run OpenAPI Test Scenario.
- Response area
- Initially this area is empty. After using the Send button, it presents the message received from the server in response to the request. The expected content type of the message is JSON. The response status and possible errors that may occur are presented right below this area. The status has a green foreground for successful requests and a red foreground otherwise.
Resources
For more information about OpenAPI editing, testing, and documenting, watch our webinar:
