Personal Workspace
The personal workspace feature allows you to make changes across multiple files within a project and then commit them to the project.
Once a project is open, an additional stripe is displayed below the top stripe with an Edit in workspace button that creates a personal workspace branch starting from the latest version on the project branch. If a personal workspace is already created, invoking the button opens the already existing workspace. You can also go straight to the personal workspace from the main Projects page.

Once inside a personal workspace, the second top stripe changes to make it clear that you are editing inside the Personal Workspace. The left stripe contains navigation options to open the Files, Publications, or Changes side-views. On the right side of the second top stripe, an Incoming commits widget shows if there are incoming changes and you can click the drop-down to display more information and access additional actions.
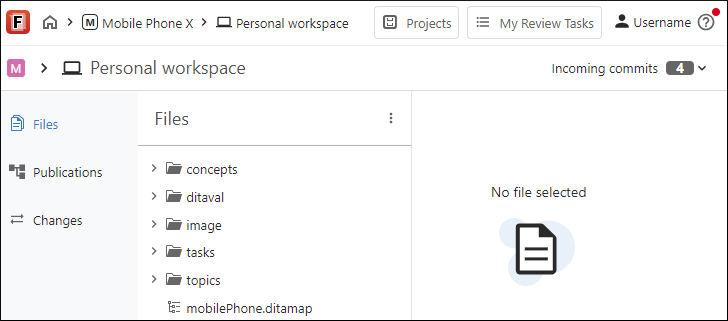
Files View
The Files view displays the file/folder tree of the workspace. You can expand or collapse folders similar to any common file browser. To add a folder to the workspace, click the 3 vertical dots next to the parent folder and select New Folder. You can create a folder on the root level by selecting New Folder from the 3 vertical dots menu in the Files header at the top. To delete a folder from the workspace, click the 3 vertical dots next to the particular folder and select Delete folder.
Click on a file to open it in the visual editor. To create a new file within a folder, click the 3 vertical dots next to the folder where you want the new file stored and select New File. This opens a dialog box where you can select from a set of templates and enter a title for the new file. To create a file in the root directory, select New File from the 3 vertical dots menu in the Files header at the top. To delete a file from the workspace, click the 3 vertical dots next to the particular file and select Delete file.
Publications View
The Publications view displays the map of a publication in a tree editor to make navigating through the topics easier. For a publication to appear, it must first be defined in the project Publications Management page. You also need to pull incoming changes into your workspace to retrieve a newly defined publication from the project.
You can click on a file displayed in the side-pane to open it in the visual editor (or double-click a file when the map is open in the tree editor).
To select a defined publication, use the drop-down control in the side-pane. This publication will be used as the context of the open editors. Changing the publication triggers a reload of the currently open editor to match the new context.
To open and edit the DITA map defined in the particular publication in a
specialized tree editor, click the
 Open in editor button
next to the drop-down control.
Open in editor button
next to the drop-down control.
Changes View
The Changes view displays all the files that have been changed in the workspace.
You can click on a file to see a comparison (diff) of the changes. The version on the left shows the current workspace version while the version on the right shows the current project version.
- Open file - Opens the latest editable workspace version of the file in the editor.
- Discard changes - Discards any changes you have made to the file in the workspace.
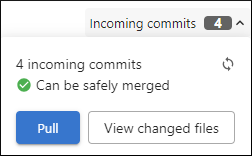
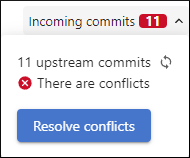
Incoming Commits
You can click the Incoming commits drop-down on the right side of the second top stripe to display more information regarding the status of incoming commits and gain access to additional actions.
Incoming commits are automatically refreshed periodically, but you can
click the  Refresh button to
refresh manually.
Refresh button to
refresh manually.
When there are no conflicts, you can click the Pull button to pull the incoming changes. This can also be done from the Changes view.
When there are no conflicts, you can also click the View changed files button to see a comparison of the incoming changes versus the current workspace version and a Pull action is available in that comparison dialog box.
If there are conflicts, the badge with the number of incoming commits is highlighted in red. You can click the Resolve conflicts button to open a dialog box where you can choose actions for resolving the conflicts.
Resolving and Merging Conflicts
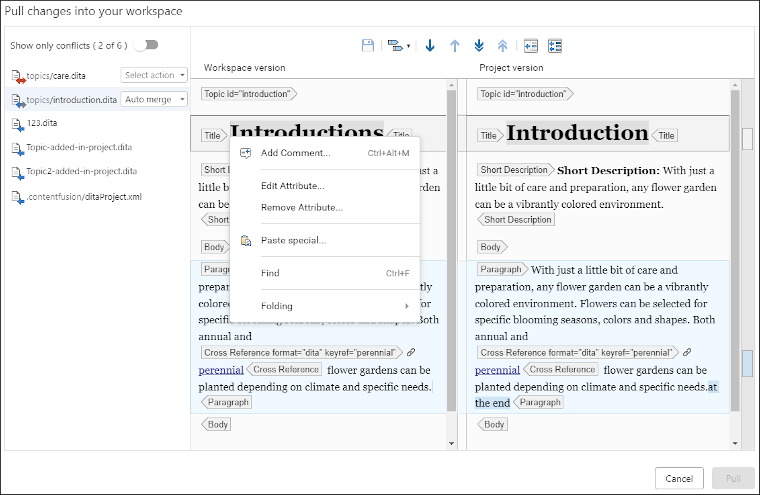
When conflicts are detected between changes in your workspace and incoming changes from the project, click the Resolve conflicts button either from the Changes view or the Incoming commits drop-down. This opens a conflict resolution dialog box.
 - Conflicting changes that cannot be
automatically merged and require manual intervention.
- Conflicting changes that cannot be
automatically merged and require manual intervention. - Incoming changes can be
automatically merged.
- Incoming changes can be
automatically merged. - Incoming files from the project that are
not present in your workspace.
- Incoming files from the project that are
not present in your workspace.
) and new files coming from the project () do not require any manual action and will be merged
when you click the Pull button. Conflicting files () require that you choose an action from the drop-down to
the right of the file entry. The possible actions are:- Manual merge - The user must edit the file and merge the changes manually.
- Keep workspace changes - Overrides the changes coming from the project with your workspace changes.
- Keep project changes - Keeps the changes coming from the project and discards your workspace changes.
Click the file entry to display a comparison of the two versions of the document. The current workspace version of the document is displayed on the left while the version from the project is displayed on the right. You can use the toolbar buttons to navigate through the changes or copy changes from the right to left (from the project to the workspace).
You can also edit your current workspace version in the left side and it includes content completion and contextual menu actions. Note that if you change the Manual merge option to another type of resolution, your changes are discarded.
Once you are finished, click the Pull button in the bottom-right corner to finish the conflict resolution and merge the changes. If you close the dialog box without using the Pull button, your changes are discarded.