Author Callouts
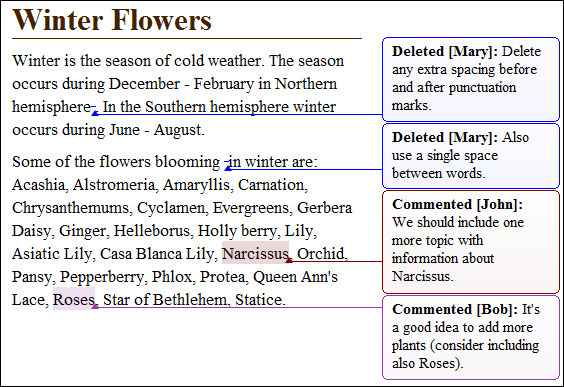
Oxygen XML Author uses callouts to present comments and tracked change modifications that you or other members of your team have added to the document.
Displaying Callouts in Author Mode
The callouts are displayed in the right side of the editing area in Author mode. They are decorated with a colored border and also have a colored background. The background color is assigned automatically by the application depending on the user who is editing the document and the type of change, but it can also be customized from the Review preferences page. This preferences page allows you to configure the colors for tracked change insertions or deletions, and for comments.
You can also choose to use the same color for all changes of that particular type of change, regardless of who makes the change. To do this, select the Fixed option for the particular type of change and choose a color from the color box. If the Automatic option is selected, Oxygen XML Author automatically assigns a color based upon the Colors for automatic assignment list.
The horizontal line that connects the callouts to their corresponding text fragments has the same color as the border. If this horizontal line is not visible, select the Show all connecting lines option in the Callouts preferences page. If you hover over a callout, it is highlighted and a tooltip is displayed that contains additional information.

 View All Changes/Comments or
 View Only Changes/Comments by is selected in the
 Track
Changes Visualization Modes drop-down menu. Oxygen XML Author does not
display callouts in
  View Final and
  View Original modes.
In some cases, the text you are editing can span into the callouts area.
For example, this situation can appear for callouts associated with wide images or space-preserved elements
that contain long fragments (such as a DITA <codeblock> element or
<programlisting> in DocBook). To help you view the text under the
covered area, Oxygen XML Author applies transparency to these callouts. When the cursor
is located under a callout, the transparency is enhanced, allowing you to both edit the
covered content and access the contextual menu of the editing area.

Adjusting Callout Width
To display more of the content in all the callouts in the current document, you can adjust the width by dragging the left side of any of the callouts. This will adjust the width for all comments in the current document. When you end the current editing session, the width of all callouts will revert back to the default value, which is the value of the Initial Width option in the Callouts preferences page.
You can also adjust the maximum number of lines to be shown in the callouts using the Text Lines Count Limit option. Note that this does not limit the number of lines in the actual comment. It only limits the number of lines shown without opening or editing it.
Type of Callouts in Oxygen XML Author
-
Comment Callouts - As long as the Comments option is selected in the Callouts preferences page, comments are displayed in callouts. A comment callout contains the name of the author who inserts the callout and the comment itself. You can also select the Show review time option to include timestamp information in the comment callouts.
Figure 3. Comment Callouts  There are several types of comments that can be added in Author mode:
- Author Review Comments - Comments that you associate
with specific content. To insert this type of comment, select the content and use
the
 Add Comment
action that is available on the toolbar (or in the Review
submenu of the contextual menu).
 - Comments Added to Tracked Changes - Comments that you
add to an already existing tracked change insertion or deletion. To
insert this type of comment, right-click the change in the main editor or its
callout and select
 Comment Change.
 -
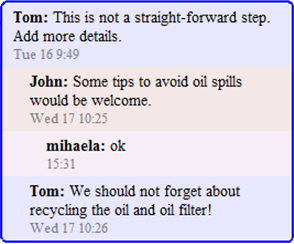
Replies to Comments - You can use this type of comment to create discussion threads. To insert this type of comment, right-click the change in its callout and select Reply. A single callout is presented for a root comment or change and its replies. The replies are displayed with an indentation in the callouts and those that are on the same level are sorted depending on the timestamp.
Figure 4. Callout for a Comment with Replies  Tip: When adding, editing, or replying to a comment, you can use Enter to insert line breaks and Oxygen XML Author will take the line breaks into account when presenting the callout. You can also use Ctrl + Enter to accept your changes and close the dialog box.
- Author Review Comments - Comments that you associate
with specific content. To insert this type of comment, select the content and use
the
-
Tracked Change Deletion Callouts - As long as the Track Changes Deletions option is selected in the Callouts preferences page, deletions that are made while the Track Changes feature is enabled are displayed in callouts. A deletion callout contains the type of callout (Deleted) and the name of the author that made the deletion. You can also select the Show deleted content in callout option to display the actual deleted content in the callout. Additionally, you can select the Show review time option to include timestamp information in the deletion callouts.
Figure 5. Deletion Callouts 
-
Tracked Change Insertion Callouts - As long as the Track Changes Insertions option is selected in the Callouts preferences page, insertions that are done while the Track Changes feature is enabled are displayed in callouts. An insertion callout contains the type of callout (Inserted) and the name of the author that inserted the content. You can also select the Show inserted content in callout option to display the actual deleted content in the callout. Additionally, you can select the Show review time option to include timestamp information in the deletion callouts.
Figure 6. Insertion Callouts 
Printing Callouts
When you print a document from Author mode, all callouts that you or other authors have added to the document are printed. For a preview of the document and its callouts, go to .
Review View
The Review view is also useful for managing the information in callouts. In this view, changes and comments are presented in a compact form, in the order they appear in the document, and they are synchronized with the changes in the callouts. You can also search for specific changes or comments and it includes some filtering options (for example, you can filter it to only show certain types of edits or to only show edits for a particular author).
For more information, see Review View.
Resources
For more information about the Callouts support in Oxygen XML Author, see our video demonstration:

 Accept
Change
 Reject
Change
 Comment
Change
 Callouts Options
 Show/Edit
Comment
 Remove
Comment