Resolving Conflicts
If you encounter conflicts when committing changes or merging branches, a convenient conflict resolution dialog box assists you with resolving the conflicts and merging the final results.
Resolving Conflicts Between Your Changes and Incoming Commits
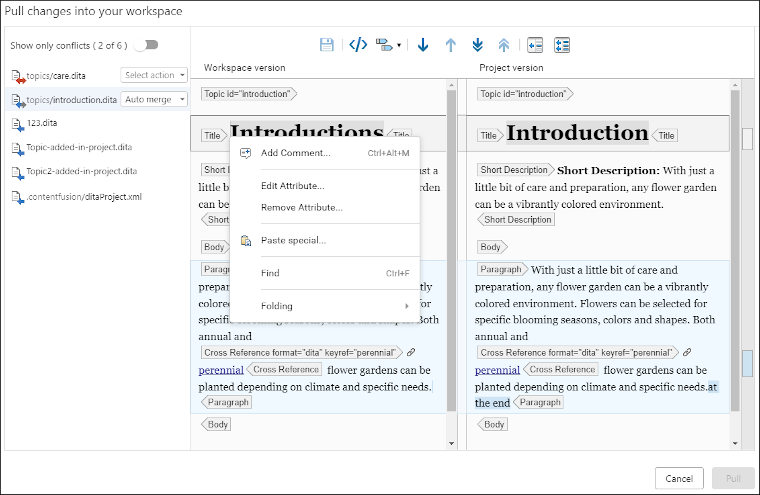
When conflicts are detected between changes in your workspace and incoming changes from the project, click the Resolve conflicts button either from the Changes view or the Incoming commits drop-down. This opens a conflict resolution dialog box.

 - Conflicting changes
that cannot be automatically merged and require manual intervention.
 - Incoming
changes can be automatically merged.
 - Incoming files from the
project that are not present in your workspace.
 ) and new files coming from the project (
 ) do not require any manual action and will be merged
when you click the Pull button. Conflicting files (
 ) require that you choose an action from the drop-down to
the right of the file entry. The possible actions are:
) require that you choose an action from the drop-down to
the right of the file entry. The possible actions are:- Manual merge - The user must edit the file and merge the changes manually. Note that only files with conflicting changes can be manually merged.
- Keep workspace changes - Overrides the changes coming from the project with your workspace changes.
- Keep project changes - Keeps the changes coming from the project and discards your workspace changes.
Click the file entry to display a comparison of the two versions of the document. The current workspace version of the document is displayed on the left while the version from the project is displayed on the right. You can use the toolbar buttons to navigate through the changes or copy changes from the right to left (from the project to the workspace).
You can also edit your current workspace version in the left side and it includes content completion and contextual menu actions. Note that if you change the Manual merge option to another type of resolution, your changes are discarded.
Once you are finished, click the Pull button in the bottom-right corner to finish the conflict resolution and merge the changes. If you close the dialog box without using the Pull button, your changes are discarded.
Resolving Conflicts When Merging Branches
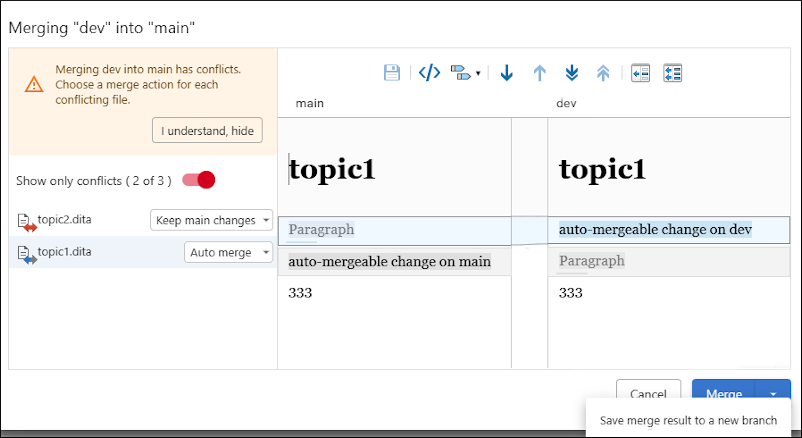
When using the Merge into current branch option from the branch management drop-down and there are conflicts, a special branch merging conflict resolution dialog box helps guide you through the merge process.

 - Conflicting changes
that cannot be automatically merged and require manual intervention.
 - The file can
be automatically merged.
 - Incoming changes from
the source branch that are not present in the destination branch.
 ) require
that you choose an action from the drop-down to the right of the file entry. The possible
actions are:
) require
that you choose an action from the drop-down to the right of the file entry. The possible
actions are:- Manual merge - The user must edit the file and merge the changes manually. Note that only files with conflicting changes can be manually merged.
- Keep main changes - Overrides the incoming changes with changes from the "main" branch.
- Keep dev changes - Keeps the incoming changes from the "dev" branch and discards your changes from the "main" branch.
Click the file entry to display a comparison of the two versions of the document. The current branch version of the document is displayed on the left while the incoming version is displayed on the right. You can use the toolbar buttons to navigate through the changes or copy changes from the right to left (from the project to the workspace).
You can also edit the version in the left side and it includes content completion and contextual menu actions. Note that if you change the Manual merge option to another type of resolution, your changes are discarded.
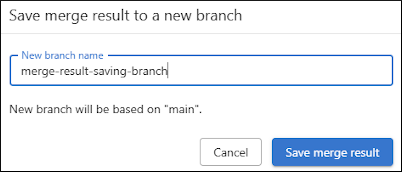
When you are finished, click the Merge button in the bottom-right corner to process the merge. This button also has a drop-down menu with a Save merge result to a new branch action that can be used to save the result of the merge process in a new branch. It opens a dialog box where you can specify the new branch name. In this case, you would click the Save merge result button after specifying the new name.

