Creating Tasks and Uploading Files
There are two ways for a Content Author to create a new task. You can create the task in Oxygen XML Editor/Author or in the Oxygen Content Fusion browser interface (the less common approach).
Creating a Task in Oxygen XML Editor/Author
Creating a task using the Content Fusion Tasks Manager view in Oxygen XML Editor/Author provides the benefits of being able to add existing files, you can select a context root map to resolve keys and references or a DITAVAL file for filtering purposes (for DITA content), you do not need to leave the application (other than to send the task link to Reviewers), and you will be able to merge proposed changes back in your project.
- If the Content Fusion Tasks
Manager view is not already opened, click the
 Show Content Fusion Task
Manager toolbar button (or go to Window /
Show View / Content Fusion Tasks
Manager).
Show Content Fusion Task
Manager toolbar button (or go to Window /
Show View / Content Fusion Tasks
Manager). -
Add files to the New Task box:
Figure 1. Adding Files to the New Task Box 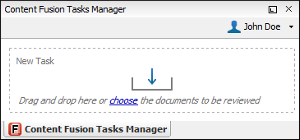 You can use any of the following methods:
- Drag files that you want to be reviewed from the Project view or your system file explorer and drop them in the New Task box (or click the Choose link to select the files) to add the files to a new task. If you drag and drop a folder from the Project view or system file explorer, all files in that directory will be added to the task.
- You can add the currently open document to a task by
selecting Add File to Review Task from the Review
submenu in the contextual menu in Author mode.
- You can also add external resources (for example, WebDAV resources or DITA references to external resources). For example, you can drag resources from the Data Source Explorer view and drop them in the New Task box. However, only modifications to external resources can be applied when you merge the changes (you cannot add or delete external resources).
- For DITA projects, drag files from the DITA Maps Manager
and drop them in the New Task box (or select
Add
to Review Task from the contextual menu in the DITA Maps
Manager). If the topic reference has unselected child nodes, a
dialog box will be displayed that asks you whether or not you want to include the
child nodes.Note: By default, DITA resources that either have a
@processing-roleattribute set to resource-only or a@formatattribute set to something other than dita or ditamap are not automatically added to a new task. If either one of these scenarios is detected, a message will be displayed indicating that some files were not added and you can click a link to open a Manage Files dialog box where you can see the reason for each file and you can choose to manually add them to the new task, if desired.Figure 2. Manage Files Dialog Box 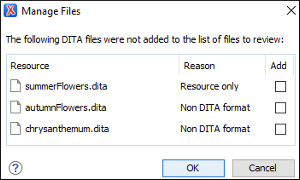
- Enter a Title for the task. This task title will help you differentiate between multiple tasks so each one should be unique.
-
[DITA Projects Only] If you are working with a DITA project, you should attach the context root map (
 ) so that all references and defined keys can be resolved
and displayed properly for the Reviewers. When you add files to the task, if a
context root map is specified in the toolbar of the DITA Maps
Manager, it is automatically added in the DITA
Context section, but you can also drag a DITA map file and drop it in
that section or click the
) so that all references and defined keys can be resolved
and displayed properly for the Reviewers. When you add files to the task, if a
context root map is specified in the toolbar of the DITA Maps
Manager, it is automatically added in the DITA
Context section, but you can also drag a DITA map file and drop it in
that section or click the  Choose context root map button to select a
map. Specifying the root map also allows Reviewers to edit content referenced
through a
Choose context root map button to select a
map. Specifying the root map also allows Reviewers to edit content referenced
through a @conrefor@conkeyrefattribute.Figure 3. Creating a New Task 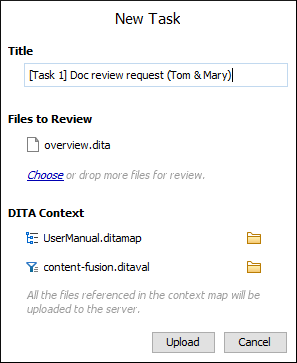
- [DITA Projects Only] If you are working with a DITA project, you can specify a
DITAVAL file (
 ) so
that the content in the uploaded DITA topics is filtered based upon the conditional
profiling attribute values defined in the DITAVAL file. You can drag a DITAVAL file and
drop it in the DITA Context section or click the
Choose
DITAVAL button to select a file. If a condition set is selected in the
DITA Maps Manager, the corresponding DITAVAL file will automatically be selected in the
task.
) so
that the content in the uploaded DITA topics is filtered based upon the conditional
profiling attribute values defined in the DITAVAL file. You can drag a DITAVAL file and
drop it in the DITA Context section or click the
Choose
DITAVAL button to select a file. If a condition set is selected in the
DITA Maps Manager, the corresponding DITAVAL file will automatically be selected in the
task. - [Non-DITA Projects] If the attached files are detected as any file type other than DITA (and a DITA map is not selected as the context root map in the DITA Maps Manager), an option (Also include all files that are referenced within the attached files) will be available. If you select this option, all files that are referenced within the attached documents will automatically be attached to the task so that Reviewers will have access to the referenced content. Also, when this option is selected, you can click the Next button to preview the referenced files and you can choose to remove any that you do not want uploaded.
- Click the Upload button to finish the task creation process and upload the information to the Oxygen Content Fusion server.
Creating a Task in the Content Fusion Browser Interface
This method of creating a task is intended for Reviewers or those who want to use Oxygen Content Fusion solely from a browser without using Oxygen XML Editor/Author, so it is less common for a Content Author, but it is available to anyone who has access to the Oxygen Content Fusion browser interface.
- Go to the Oxygen Content Fusion browser interface. If you do not know your base URL (for example, https://fusion.oxygenxml.com), there are several ways to reach the browser interface from the Content Fusion Tasks Manager view. For example, you can click the link in any existing task, or right-click a task and select Open task in browser, or select Go to my account from the User Name drop-down menu at the top-right corner of the view.
-
Log in, if necessary. Then click your user name at the right side of the top ribbon and select My Tasks.
Step Result: This opens a page that displays a list of all the current tasks that are either assigned to you or were created (owned) by you.
-
Click the NEW TASK button.
Step Result: This opens a new Task Details page where you can add a title, add new files from templates, retrieve the task link to share with others, and more.
- Click the text field where it shows Add a title to enter a description or title for the task.
- Click the NEW FILE button to create a new file from a list of templates. The newly created file will automatically be attached to this new task.
- Click on the file name to open it in the visual editor where you can proofread, add comments, and make changes to the document.
- The next logical step would most likely be to share the task link either with anyone
you want to review the documents or with a Content Author who can
integrate the new content into their project in Oxygen XML Editor/Author.
To retrieve the link, you can click the SHARE button, then use
the
 Copy button to copy the link to the clipboard. You could also copy the
link from the browser address bar.
Copy button to copy the link to the clipboard. You could also copy the
link from the browser address bar.