Creating a Site Configuration and Installing Feedback
To create a new site configuration, click the Add site button at the top-right corner of the Sites page, or the Add site link in the Dashboard page (or if this is your first site configuration, click the Add your first site button in the Get Started pane). Next, a three-step wizard is initiated for creating the site configuration and installing it on your website or in your WebHelp documentation. The three pages used for the site creation wizard are the Settings, Version, and Installation page. When you create a site configuration, you are automatically assigned a user role of Owner for that site configuration.
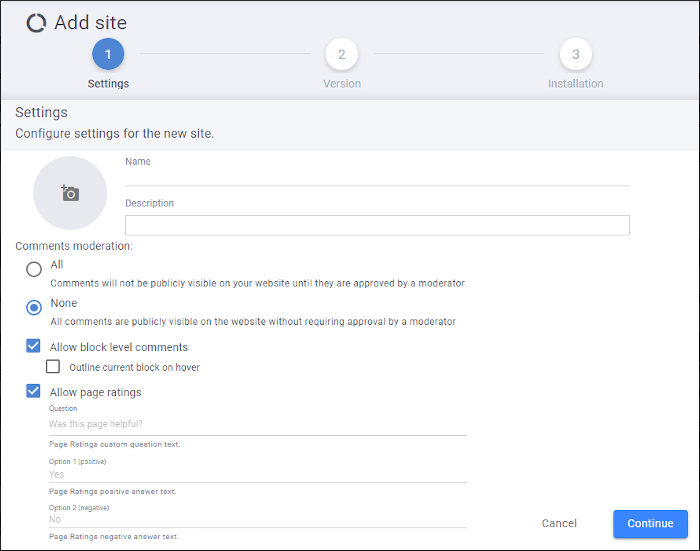
Settings Page
The first page of the site creation wizard is the Settings page.
This wizard page includes the following options and features:
- Add a logo
- Click anywhere in the circle that contains the camera icon (
 ) to select an image to use
for the logo for this site configuration. The logo will be displayed in the tile for
this site configuration in the Sites page (it is also displayed in the header of the
commenting component in the output). The supported extensions are: .jpg,
.jpeg, .png, .gif. The maximum allowed size is 2048 KB.Note: When loading large logo images, they might be resized and lose some image quality. This is done to reduce network data traffic.
) to select an image to use
for the logo for this site configuration. The logo will be displayed in the tile for
this site configuration in the Sites page (it is also displayed in the header of the
commenting component in the output). The supported extensions are: .jpg,
.jpeg, .png, .gif. The maximum allowed size is 2048 KB.Note: When loading large logo images, they might be resized and lose some image quality. This is done to reduce network data traffic. - Name [Required]
- The name of the site configuration. This will be displayed as the title in the tile
for this site configuration in the Sites page (it is also displayed in the header of the
commenting component in the output).Note: The site configuration name is unique per organization. Each organization cannot have more than one site configuration with the same name.
- Description [Required]
- The description of the site configuration. This will be displayed as the description in the tile for this site configuration in the Sites page.
- Comments moderation
-
- All - Select this option if you want all comments to require approval by an Owner, Admin, or Moderator before they are posted for all users to see. Also, each Owner, Admin, and Moderator for the site configuration will receive an email when a user adds a comment notifying them that there is a comment waiting for approval.
- None - Select this option if you want all comments to be automatically approved and posted for all users to see.
Tip: For more information, see Site Comments Moderation. - Allow block level comments
-
Controls whether or not block-level comments are enabled in the output.
- Outline current block on hover
- Available if the Allow block level comments option is enabled. If this option is selected, an outline is rendered on any block elements that allow block-level comments when hovering over the element (if the element does not already have a comment associated with it).
- Allow page ratings
-
Controls whether or not a page ratings component is displayed in the output. You can also configure the question and the two possible options that will be displayed in the output:
- Question - The page ratings question that is displayed in the output. The default value is Was this page helpful?
- Option 1 (positive) - The positive response to the question. The default value is Yes.
- Option 2 (negative) - The negative response to the question. The default value is No.
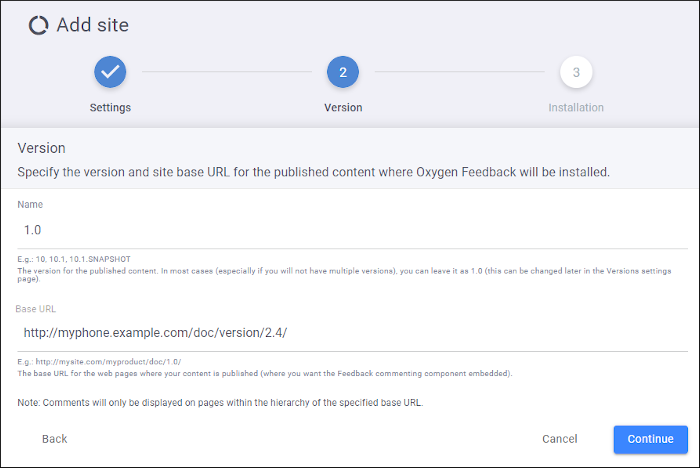
Version Page
The second page of the site creation wizard is the Version page where you must specify a version and the base URL from your website where the WebHelp output is deployed.
This wizard page includes the following options:
- Name
- This is where you specify the version name or identifier. This is helpful if there will be multiple versions for your output. For example, if your published output is documentation for a product that has multiple released versions, each version probably has its own published documentation. In this case, each published version requires a different configuration since the version and base URL would be different for each of them. The version can be used later to decide whether or not comments from older versions are shown in new published versions. This is managed in the Site Versions page. In most cases (especially if you do not plan to have multiple versions), you can leave the name of the version as 1.0.
- Base URL
- This is where you specify the base URL for the website where you publish your output.
For WebHelp output, for example, it is the URL where your WebHelp output is deployed.
Only
httpandhttpsprotocols are allowed and it must NOT point to a file (e.g. http://example.com/index.html is not allowed).Warning: The comments component will only appear on pages within the hierarchy of this base URL. For example, https://example.com/a IS a base URL for https://example.com/a/b, while it IS NOT a base URL for https://example.com/abc.
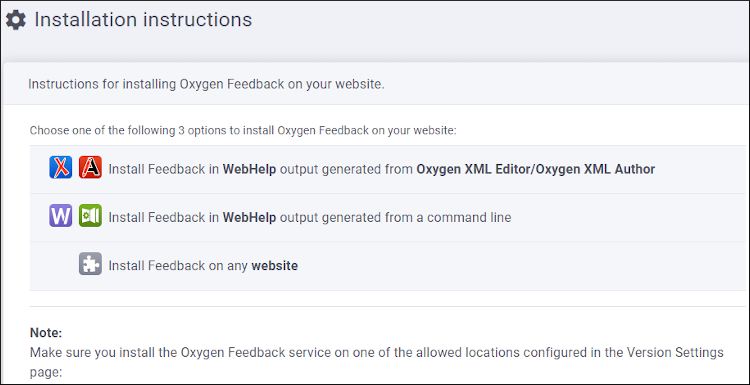
Installation Page
The third page of the site creation wizard is the Installation page. This page is where you choose how to install the configured Feedback system. You can choose between three options:
- Install Oxygen Feedback in WebHelp output generated from Oxygen XML Editor/Author
- Choose this option if you are adding the Feedback system to WebHelp Responsive documentation AND you will generate the documentation using a transformation scenario in Oxygen XML Editor/Author.
- Install Oxygen Feedback in WebHelp output generated from a command line
- Choose this option if you are adding the Feedback system to WebHelp Responsive documentation AND you will generate the documentation using a command-line script.
- Install Oxygen Feedback on any HTML-based website
- Choose this option if you are adding the Feedback system to a website. When you select this option, an HTML fragment will be displayed. You need to copy this fragment and paste it into your HTML code for each webpage that you want to have the Feedback system embedded.