Version Settings
The Site Versions page can be used to add or edit
versions for a site configuration and you can choose to install a particular version in your
website or WebHelp output. Each site configuration can have multiple versions. This is useful
if you have multiple versions of the output (for example, multiple versions of published
technical documentation or multiple article revisions). To reach this page, click the
 Versions link in the left menu bar in the interface for a particular site
configuration. Each version for a site configuration is displayed as a tile. Each tile
displays the version, the creation date, and the URL for the particular version.
Versions link in the left menu bar in the interface for a particular site
configuration. Each version for a site configuration is displayed as a tile. Each tile
displays the version, the creation date, and the URL for the particular version.
Versions that do not have any page views detected in the output have a warning icon ( ) and message (This version has no page
views) displayed in the tile. No page views usually means that the site/version
has not been installed so these warnings are meant to offer troubleshooting hints.
) and message (This version has no page
views) displayed in the tile. No page views usually means that the site/version
has not been installed so these warnings are meant to offer troubleshooting hints.
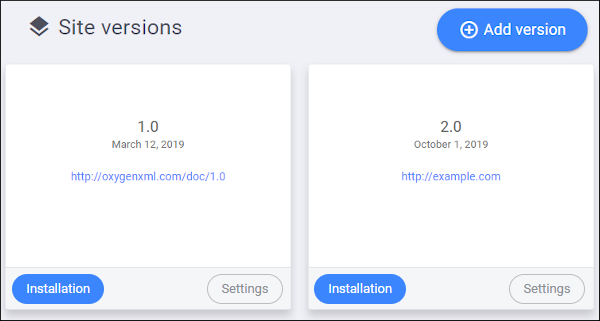
This page includes the following actions:
- Add Version
-
To add a new version, click the Add Version button on the right side of the page. This initiates a two-step wizard for configuring the new version.
- Step 1 - Settings
-
This wizard page includes the following options:
- Name
- Specifies the name of the version for the site configuration. Each site configuration can have multiple versions. This is useful if you plan to have multiple versions of the output (for example, multiple versions of published technical documentation or multiple article revisions).
- Base URL
- Use this option to specify the Base URL for
your website. Only
httpandhttpsprotocols are allowed and it must NOT point to a file (e.g. http://example.com/index.html is not allowed).Warning: The comments component will only appear on pages within the hierarchy of this base URL. For example, https://example.com/a IS a base URL for https://example.com/a/b, while it IS NOT a base URL for https://example.com/abc. - Creation Date
- Use this option to specify a creation date. This date is displayed in the tile for the particular version in the Site Versions page.
- Show Comments from Older Versions
- By default, comments are only displayed for the current version.
However, you can select this option to choose to also show comments from
either All Versions or All Versions
Starting with a particular version number.Tip: The version number is displayed on the right-hand side of the comment box in both the output and in the Comments page.
- Display in-place error message for comments component
- Select this option if you want an error message to be displayed
directly in the location where the comments component should appear if
any issues arise during the integration process. A hyperlink is also
displayed that directs you to a user guide topic to help you
troubleshoot the issue.Tip: It is recommended to keep this feature enabled during the initial setup or when making changes to your site configuration. This can help quickly identify and resolve integration issues.
- Enable Content Indexing
- Select this option to enable content indexing for this version and you can specify the language that will be used while indexing and searching the output. For more details, see Enable Content Indexing.
Click the Continue button to proceed to the next wizard page.
- Step 2 - Installation
-
The second wizard page includes options for choosing how to install the particular version of the Feedback system. There are three options:
- Oxygen XML Editor/Author
- Choose this option if you are adding the Feedback system to WebHelp Responsive documentation AND you will generate the documentation using a transformation scenario in Oxygen XML Editor/Author.
- Command-Line Script
- Choose this option if you are adding the Feedback system to WebHelp Responsive documentation AND you will generate the documentation using a command-line script.
- Any Platform
- Choose this option if you are adding the Feedback system to a website. When you select this option, an HTML fragment will be displayed. You need to copy this fragment and paste it into your HTML code for each webpage that you want to have the Feedback system embedded.
- Settings
-
To edit an existing version, click the Settings button at the bottom-right corner of the tile for a particular version. This opens an Version settings page.
Figure 2. Version Settings Page 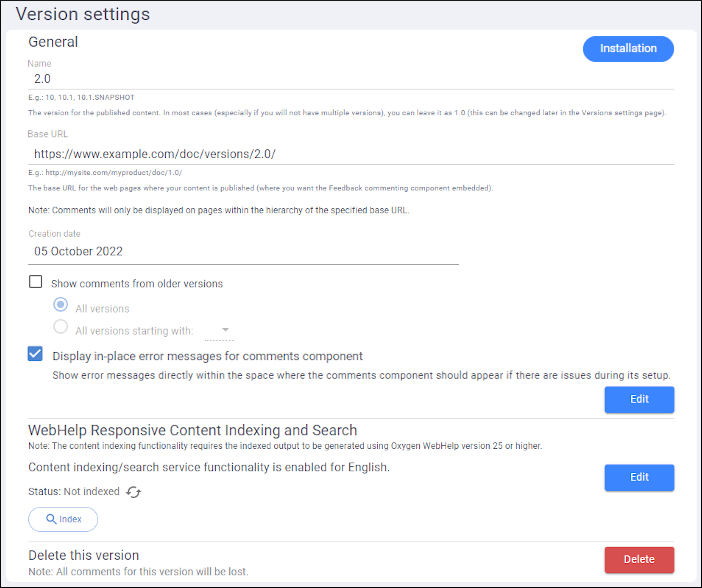
This settings page includes the following options:
- Name
- Specifies the name of the version for the new site configuration version.
- Base URL
- Use this option to specify the Base URL for your website.
- Creation Date
- Use this option to specify a creation date. This date is displayed in the tile for the particular version in the Site Versions page.
- Show Comments from Older Versions
- By default, comments are only displayed for the current version. However, you can click the Edit button to the right of this option to choose to also show comments from either All Versions or All Versions Starting with a particular version number. Make sure you click the Save button (that replaces the Edit button) after making a change.
- Display in-place error message for comments component
- Select this option if you want an error message to be displayed directly in the location where the comments component should appear if any issues arise during the integration process. A hyperlink is also displayed that directs you to a user guide topic to help you troubleshoot the issue.
- WebHelp Responsive Content Indexing and Search
- Prerequisites:
- The output must be generated using Oxygen WebHelp version 25 or later.
- The website that will be indexed but be accessible to the Oxygen Feedback server.
- The root directory of the published output must include the sitemap.xml file that is generated by the Oxygen XML WebHelp Responsive transformation (it contains all the files that should be indexed).
Use this option to enable/disable content indexing and to configure search functions. When content indexing is enabled for a site's version, the corresponding WebHelp Responsive output will use Oxygen Feedback as the search engine when users search the published content. If content indexing is disabled, the search will be performed using the JS Search Engine bundled in the WebHelp Responsive output.
Click the Edit button to the right of this option to expand the section to expose the Enable content indexing toggle option (use this option to enable or disable content indexing).
Once the content indexing is enabled, you can choose the language that the search engine will use for the indexing.
AI FeaturesThe AI Features section contains options for configuring AI-enhanced search functionality. These AI-related options are available if you have configured Oxygen Feedback Enterprise to connect to OpenAI™ on your behalf in the Organization Profile page.Notice: To use the AI features, you must have an AI-ready subscription. See https://www.oxygenxml.com/oxygen_feedback/buy_feedback.html for information about the available subscription plans.- Enable semantic search - Activates functionality to enable semantic searches, an advanced search technique that aims to improve the accuracy and relevance of search results by understanding the context and meaning behind the search query, rather than relying solely on keyword matching.
- Enable AI Assistant - If selected, WebHelp sites that have Oxygen Feedback Enterprise installed will have an AI Assistant button displayed in the lower-right corner of each page that will allow users to interact with the AI Assistant to help find answers to questions and find information more quickly and accurately.
- Enable Assistant debug mode - Selecting this option enables the debug mode for the AI Assistant. When enabled, a Debug button appears at the bottom of the chat window for users with a role of Admin or Owner. Clicking the button displays the complete set of interactions between Oxygen Feedback Enterprise and the AI.
- Enable AI-enhanced search summary - If selected, when a user enters a search query in the WebHelp search results page, an AI-generated response to the search query is displayed before the usual search results. The response is generated using the AI Assistant based upon information found in the current publication.
Notice: The AI Assistant and AI-enhanced Search Summary features can generate costs. It is recommended to use support from OpenAI to configure a budget limit on the API key configured for the organization.Make sure you click the Save button (that replaces the Edit button) after making a change.
Status shows you the current status of the indexing. To the right of that is a
 Check Index Status button
that can be used to query the OTSS server for the status of the current
content indexing.
Check Index Status button
that can be used to query the OTSS server for the status of the current
content indexing.Click the Index button to manually trigger an indexing. It then shows how often the indexing will automatically be triggered when there is a change in the content. Also, after clicking the Index button, it is replaced with a Reindex button for triggering a new indexing operation and a Delete button for deleting the associated index.
Tip: For more details about the content indexing functionality, watch our webinar: How to Enable Content Indexing and Search in Oxygen Feedback 3.0. - Delete this version
- You can delete a particular version by clicking the Delete button. You will be asked to confirm the operation and if you proceed, all comments for this particular version will be lost.
- Install Version
-
To install an existing version, click the Installation button at the bottom-left corner of the tile for a particular version. This opens an Installation Instructions page where you can choose how to install the particular version of the Feedback system. There are three options:
- Oxygen XML Editor/Author
- Choose this option if you are adding the Feedback system to WebHelp Responsive documentation AND you will generate the documentation using a transformation scenario in Oxygen XML Editor/Author.
- Command-Line Script
- Choose this option if you are adding the Feedback system to WebHelp Responsive documentation AND you will generate the documentation using a command-line script.
- Any Platform
- Choose this option if you are adding the Feedback system to a website. When you select this option, an HTML fragment will be displayed. You need to copy this fragment and paste it into your HTML code for each webpage that you want to have the Feedback system embedded.